By Michelle of Abigail Michelle
Stabilizer is one of the most important factors to take into consideration when doing machine embroidery. Without proper stabilizer or techniques, your hard work can suffer. It makes a big difference in the quality of your work.
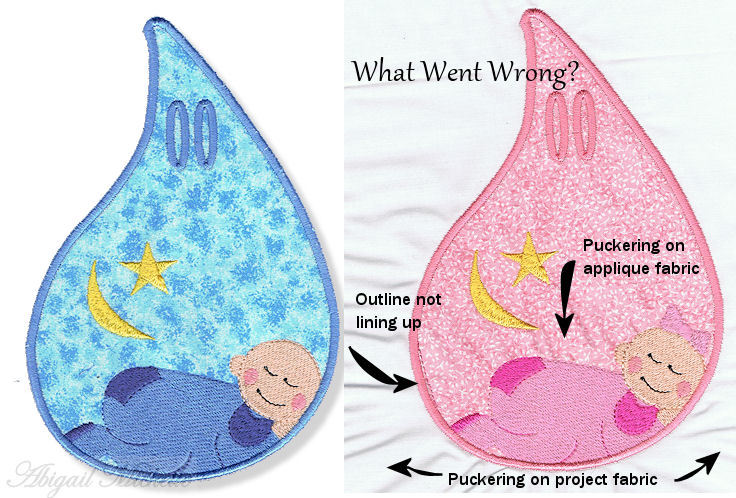
Below are two stitchouts of the same design (minus the bow on one). How can one stitch perfectly while another has many problems? They were both stitched on the same machine with the same threads, needle and fabric.
Stabilizing correctly can make or break a design. Here, we share some basic information about the different kinds of stabilizer and what they are used for.
The most important factor when embroidering is to hoop your project correctly, tightly and with the correct stabilizer to *prevent the fabrics from moving in your hoop*.
There are a few main types of stabilizer for machine embroidery.
Tear-Away Stabilizer
This is a stabilizer that is generally lightweight and low density, so it will literally tear away from your stitches when you are ready to remove it.Tear-away is suitable for designs that are not dense and do not have clear outlines. Once you are done embroidering the design, you can remove your project from the hoop and tear the excess stabilizer away, leaving just your embroidery behind.
Woven fabrics (or fabrics without obvious stretch) can do well with this type of stabilizer as long as the design is suitable for it, as mentioned above.
Cut-Away Stabilizer
Cut away is another type of stabilizer for machine embroidery. This is a more stable product and has many positive factors. It is more stable because it is denser in its fibers and therefore stronger. You cannot rip into this easily; it must be cut away from your embroidery design. Leaving a small amount around the finished design is helpful- usually at least 1/4". This helps the design to "stay put" and not get pulled around once it gets worn or used. It can also help to prevent puckering.
This type of stabilizer is very useful for embroidering knit fabric, such as T-shirts. The heavier, dense fibers give the embroidery design more substance when using it with the lighter weight, stretchy fabrics.
Cut-away stabilizer is also a good choice if your embroidery design is dense, has a higher stitch count, or has a clear outline. It will help keep the outline where it should be, and will be more able to handle denser designs than tear-away will.
Polymesh Stabilizer
Polymesh is another option that is great for knits and other fabrics. It is lightweight and very soft! I like to use two layers and place each layer perpendicular to each other, crossing the grains at a right angle. This gives it better stability. I like using polymesh for baby items, but you may find many more uses for it as well.
"Sticky" Stabilizer
Another useful stabilizer is called "sticky". It is sold on rolls or sheets and has a thin layer of paper over it. Once it is hooped, you lightly score the paper and peel it back, exposing the sticky sheet underneath.
This is best to use with T-shirts or other knit fabrics that tend to move around in the hoop. The sticky surface adheres to the knit fabric and keeps it in place. When applying your knit fabric to this stabilizer, watch the grain of the fabric. The lines of the grain should remain straight, not pulled into wavy lines.
Sticky stabilizer is also very useful for embroidering areas that are not easy to hoop, such as necklines or socks. For example, when embroidering something very close to the neckline, simply hoop the sticky stabilizer and remove the top layer of paper as explained above. Lay the neckline of your project onto the hoop, securing it into the position you need for your design. You may also add a layer of tear-away or cut-away stabilizer if needed, either in the hoop under the sticky or "floating" under the hoop, unsecured. If your embroidery machine has a basting stitch for the embroidery area, now is a great time to use it. We have free basting stitches for you located in the free section at SWAKembroidery.com. Now that your neckline garment is secure in the hoop, you can position your hoop to embroider your design. This may take some practice, but can have so many rewards!
Sticky Spray Stabilizer
There are also sticky sprays that are available. To use these, hoop your correct tear-away or cut-away stabilizer. Then spray lightly (according to manufacturer’s direction) and then apply your fabric. It works in the same way. You may find you prefer one or the other, so give both a try!
Iron-On Stabilizer
Similar to sticky stabilizer is "iron-on" stabilizer. As the name indicates, it is ironed onto the underside of your fabric and is usually permanent. It is heavier than sticky,
Iron-on stabilizer can help even the more dense designs stitch out without shifting. However, it can be brutal on needles and thread, so I recommend using a new needle and slowing down your machine, even stopping from time to time, to avoid friction and thread breakage.
Solvy Stabilizer
An often overlooked tool in embroidery is called "Solvy". This is a clear stabilizer that is soluble, either by water or by heat. Water soluble will melt by spraying or dipping it into water. Heat soluble will melt by applying heat, usually from an iron.
This stabilizer is extremely useful when embroidering on fabrics that have a high loft or a lot of stretch. Fabrics such as knits (T-shirts), towels, chenille, fleece, corduroy and velvet to name a few, are perfect for this.
Embroidery threads tend to "sink" into these fabrics and do not give a good end result to your embroidery design. By using a layer or two of Solvy on top of your fabric when embroidering, can make a world of difference. The job of this stabilizer is to keep a space between the threads and the fabric. Solvy helps to keep your design on top of the fabric, instead of sinking into the fabric.
Another wonderful use for Solvy is when embroidering free-standing lace. There are so many gorgeous free-standing lace (FSL)* designs available and they have countless uses. By hooping a layer (or a few, depending on the thickness of the stabilizer), of soluble stabilizer, one can easily stitch out FSL designs. When they are finished stitching, gently remove from the hoop. Tear away any left-over stabilizer, and soak the design in water (or use an iron if it’s heat soluble). You will be left with a gorgeous design to use on many of your projects.
*FSL is best used with thicker soluble stabilizers such as Badgemaster or Vilene.
There are many ways to stabilize, and each project has its own special needs. Trial and error is usually the best way to find what works for you and your individual machine.
